-
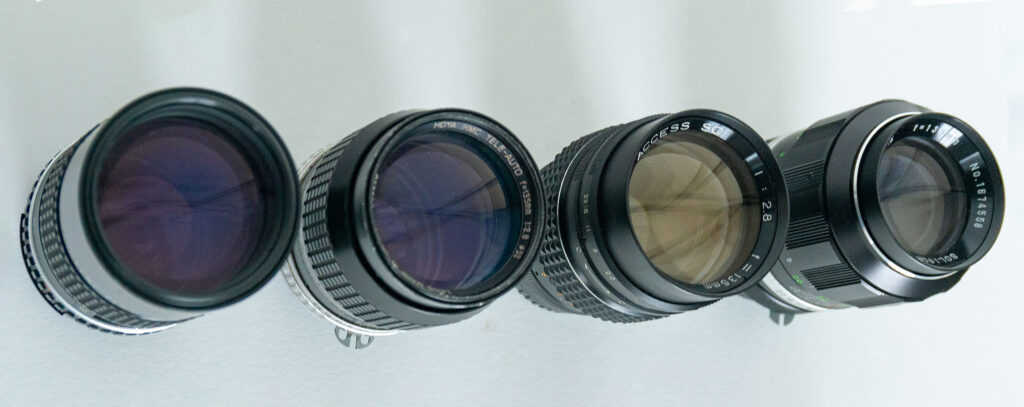
Nikon Series E 135mm lens vs 3 aftermarket lenses
I know it’s a bit of a weird title! The title is deliberately a little vague, because at the time of creating the post I had no idea what other lenses I could obtain.
Now I have a quartet of lenses to test and compare – starting off we have the Nikon 135mm f2.8 ‘made to Nikon specification’ Series E lens, next is a Hoya 135mm f2.8, followed by a preset Access SQ 135mm f2.8 and finally a Soligor 135mm f3.5. All the lenses in this test were made circa 1980’s.
The purpose of the test was to see how well these vintage lenses perform with a full frame digital camera, as well as with traditional black and white negative film
A little background information
A good few years ago (alright a lot of years ago!) When zoom lenses were not so popular or refined as they are now, chances are that when buying a new lens to suppliment the standard 50mm lens that more than likely came with your camera, there were two choices a wide angle lens or a telephoto lens. If you opted for a telephoto, then chances were it would be a 135mm lens.
All the main camera manufacturers had their own version of a 135mm lens available – generally it would have a maximum aperture of f2.8 although one or two offered a slightly slower and cheaper option with a maximum aperture of f3.5. In addition to this there was a vast number of third party 135mm lenses available – in reality despite the number of brands on offer, the number of actual manufacturers was significantly smaller. Prime examples are in our test selection :The Nikon lens was made by Kino Optical (Kiron) to Nikon specifications, whereas the Hoya 135mm lens was a rebadged Tokina made lens (Hoya supplied the glass), Access 135mm was also available badged as a Photax lens amongst other names – the actual manufacturer could possibly have been Kobori, finally Soligor 135mm was made by Tokina.
Testing Procedure
For the colour digital tests the lenses were in turn attached to a Nikon D800 body mounted on a Camlink tripod, shutter actuated by remote control to eliminate movement. ISO set to 100, daylight balance, zero exposure adjustment, matrix metering, camera set to aperture priority and images recorded in Raw. Weather conditions were wind free with an overcast sky. Images were converted to Jpeg in Adobe Camera Raw with zero sharpness added.
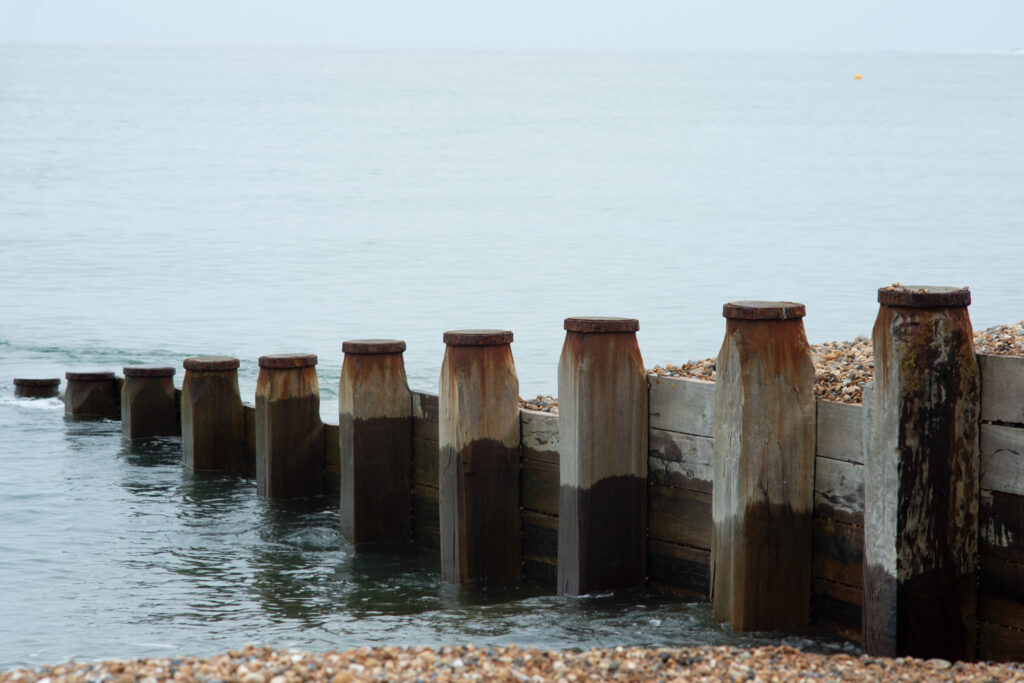
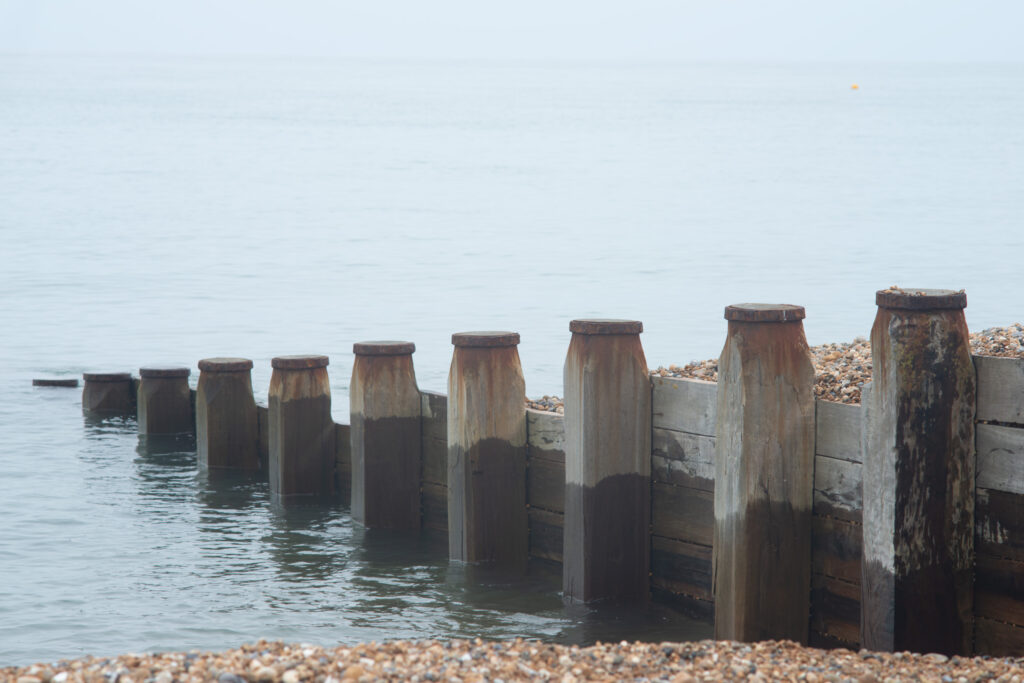
A series of exposures were made from f2.8 (f3.5 Soligor) to f22 and lenses were focused at infinity for the photographs of the pier, whilst the photographs of the breakwater exposure was made at f8 and the lens was focused on the third breakwater upright using focus confirmation.
The black and white film tests were performed using a Nikon F90x loaded with Kodax Double X film and processed in 510 Pyro. Again the camera was mounted on my trusty Camlink tripod and shutter actuated by remote control. ISO was set to 100, zero exposure adjustment, spot metering and camera set to aperture priority. Weather conditions were sunny, bright and wind free. Images were scanned on a Plustek OpticFilm 7600i at 1800dpi using VueScan software with sharpening set to none.
Exposures were made at maximum aperture (f2.8 and f3.5 for the Soligor lens), f5.6 and f16 – lenses focused visually at infinity.
Specifications
Nikon Hoya Access Soligor
Focal Length 135mm 135mm 135mm 135mm
Construction 4 elements in 4 groups 5 elements in 4 groups 5 elements in 4 groups 5 elements in 4 groups
Aperture Range f2.8 – f32 f2.8 – f22 f2.8 – f22 f3.5 – f22
Focus Range 1.5m – Infinity 1.5m – Infinity 2.2m – Infinity 1.8m – Infinity
Filter Size 52mm 55mm 58mm 49mm
Weight 390g 407g 362g 393g
Length 104mm 79mm 88mm 95mm

Notice how each of the lenses has a different coating on the optics, this results in a subtle difference in contrast and colour balance.
The Results
Digital

Nikon from f2.8 to f22

Hoya from f2.8 to f22

Access from f2.8 to f22

Soligor from f3.5 to f22
Digital mid range test.
Nikon at f8
Hoya at f8

Access at f8

Soligor at f8
Black and white negative film
Nikon at f2.8, f5.6 and f16
Hoya at f2.8, f5.6 and f16
Access at f2.8, f5.6 and f16
Soligor at f3.5, f5.6 and f16
Results
Digital colour results – infinity focus
All the lenses displayed a level of softness and vignetting at their widest aperture, both the Nikon and Access lens were also even softer on the edges – the Access lens being worse than Nikon. Disappointingly the Hoya lens was very soft overall as well as being low in contrast and showed signs of fringing. The lenses improved at f4 and by f5.6 were better still with only a hint of vignetting still showing, from f8 to f11 all the lenses were reaching their optimum sharpness across the frame. At f16 both Access and Soligor lenses were again equally sharp across the frame, whilst the Nikon and Hoya lenses were starting to lose a little sharpness at the edges. Stopping down to f22 all the lenses were starting to get soft due to diffraction.
Mid range focus test
The results from this test seem to confirm that all the four lenses perform better at the middle of their focus range than at infinity, in that all were equally sharp at f8, sadly however the Hoya lens displayed an obvious lack of contrast despite being a multicoated lens. Incidentally Nikon do say on their ‘The 1001 Nights’ series of articles on the development of a range of various Nikon lenses, that the Series E 135mm lens was balanced for best performance at four to five metres.
Black and white negative film results.
This batch of tests proved a little different from the digital test.
Once again all the lenses were a little soft and showing signs of vignetting at their widest aperture, although this time it was both the Hoya and Access lenses that were softer on the edges, again the Hoya had a lower level of contrast than the other three lenses. Once stopped down to f5.6 all four lenses were sharp over the entire frame and there was only the slightest hint of vignetting. At f16 surprisingly all the lenses were still very sharp across the whole frame.
Conclusions
Using these four lenses meant adopting a couple of different metering methods, both Nikon and Hoya lenses were auto diaphragm – so could be focused and metered in aperture priority (aperture set accordingly). The Soligor lens should in theory operate the same way, but due to an issue with the lens linkage this was not possible and had to be set in manual mode. The Access lens is a pre set design, which means that whilst focusing can be done at full aperture the lens has to be manually stopped down using the stop down ring prior to making the exposure – see the photograph of the lens line up for more clarification.
Worth noting is that the three aftermarket lenses focus rings rotate in the opposite direction to the Nikon lens whilst in practice this is no major problem.
All four lenses worked satisfactorily on digital when shooting at infinity provided they were stopped down to at least f8. The overall colour balance was cooler with both the Access and Soligor lenses, this is more than likely due to the lens coatings. The Hoya is the only lens marked as multi coated, whilst the Nikon is quoted as being single coated on all elements (this was done to keep production costs down) I would guess that both Access and Soligor are probable single coated too.
It must however be said that film photography is where all these lenses perform at their best, being sharper at only 2 stops down and maintaining that sharpness. The only issue is with the Hoya lens due to its lower contrast when compared to the other lenses.
I must also add a special thanks to my good friend Mark for the generous use of the 2 Nikon Series E lenses used in the two lens reviews.
In summing up, if you find a 135mm manual focus lens at a reasonable price, give it a go, you might be pleasantly surprised.
-
A Tale of Two Lenses
I must confess, I have a liking for older lenses. In the main they seem to be more robust in construction and generally less complex in construction.
Whilst browsing the web I came across various references to Kiron lenses and their history of manufacturing lenses for other companies, this got my attention!
A large number of early Series 1 and other Vivitar lenses were produced by Kiron, sometimes these lenses were jointly designed by Kiron and Vivitar and subsequently sold by both brands with slight variations in their appearance to differentiate them.
What is less well publicised is that Kiron also manufactured the Series E lenses for Nikon, these lenses were made exclusively to Nikon’s own design specifications and not sold under any other brand name.
Not long ago whilst browsing a well known auction site! I spotted a Kiron 70 – 150mm lens at a very good price, so I bought it. Ok so it had an Olympus OM lens mount, not a problem since I have amongst my camera collection an Olympus OM film body. A quick message to my good friend Mark and I now had the loan of his Nikon Series E 75 -150mm lens to enable me to perform a comparison. Next problem was could OM mount be adapted for use on a Nikon DSLR and the answer to that is not easily. A slight setback! Never mind back to the auction site and lo and behold a Vivitar 70 -150 lens with a Nikon F mount, needless to say I purchased that quickly. Now I could do a proper comparison between the two lenses.
After a couple of preliminary tests I noticed something odd with regards to the colour balance, so I started looking for another brand of 70-150mm lens to provide another set of grey target images for comparison. As a result I obtained a Hoya 70-150mm f3.8 with a Pentax K mount. Incidentally, whilst Hoya did not manufacture lenses, they did make glass used within the lens They were (and still are) one of the largest producers of optical glass in Japan.

Lenses from left to right – Nikon 75-150mm, Vivitar 70-150mm, Kiron 70-150mm, Hoya 70-150mm
Specifications
Nikon Kiron/Vivitar Hoya
Focal Length 75 – 150mm one touch zoom 70 -150mm one touch zoom 70 – 150mm one touch zoom
Construction 12 elements in 9 groups 15 elements in 10 groups 12 elements in 9 groups
Aperture Range f3.5 – f32 f4 (Kiron) f3.8 (Vivitar) – f22 f3.8 – f22
Focus Range 1m – Infinity 0.9m (macro) – Infinity 1.5m – Infinity
Filter Size 52mm 52mm 55mm
Weight 520g 585g 481g
Length 117mm 97mm 127mm

Worth noting- Nikon lens has depth of field markings, but no infra red adjustment; whereas the other three lenses only have infra red adjustment markings
Testing Procedure
The Nikon and Vivitar lenses were attached to a Nikon D800 body mounted on a Manfrotto 190 tripod, shutter actuated by remote control to eliminate movement. ISO set to 100, daylight balance, zero exposure adjustment, matrix metering, camera set to aperture priority and images recorded in Raw.
A series of exposures were made from f3.5 (f3.8 Vivitar) to f22 and at 75mm to 150mm for the Nikon lens and 70mm to 150mm for the Vivitar lens.
In the case of the grey target tests, camera distance was changed when the lenses were zoomed to maximum to ensure the target remained a similar size.
Out of interest I wanted to compare both the Kiron and Vivitar variations against the Nikon and Hoya lenses – so I purchased an adapter to enable me to put the OM mount Kiron lens on my Fuji X-T1 body (I already own Nikon F to Fuji and Pentax K to Nikon F adapters) For the grey test the settings used were as before, the only exception being that the ISO was set at 200- this is the base ISO for the X-T1.
All images taken were viewed in Adobe Photoshop and Adobe Camera Raw on a colour calibrated monitor.
Results
The first thing that I noticed when comparing initial tests was that the Vivitar lens produced a more yellow image. This led me to the purchase of the Hoya 70 – 150mm lens to provide an additional reference point. When comparing all 4 lenses in Adobe Camera Raw, I made a spot colour check at the same quadrant on the grey target. Both the Nikon and Hoya lenses gave a near even RGB reading, whereas both Kiron made lenses showed a dip in the blue values.
I tested both Nikon and Vivitar for full frame sharpness and coverage – photographs of the local pier were taken at 70mm and 150mm at all full apertures from f3.5 / f3.8 to f22.
Both lenses exhibited obvious vignetting in the corners at full aperture, reducing at f5.6 and gone at f8 to minimum aperture.
Sharpness was quite a mixed bag – at 70mm both lenses were soft on the edges at full aperture, sharpening up at f8 and starting to drop off at f16. Centre of frame results showed the Nikon lens again being soft a full aperture, sharpening up by f8 and dropping off by f16, the Vivitar however was sharp by f5.6 but again dropping off at f16. One worrying issue was the fact that at full aperture the Vivitar lens a substantial amout of flare in the highlights, once the lens was stopped down to f5.6 this had cleared.

Vivitar 70-150 at 70mm

Nikon 75-150 at 75mm

Flare on Vivitar lens at 70mm at f3.8
The 150mm setting tests gave some very strange results indeed.
The Nikon displayed serious red fringing at f3.5, this cleared by f8. In terms of sharpness the lens was a little soft at the edges wide open, improving at f5.6, peaking at f11 but starting to drop off at f16 and f22.
The Vivitar lens was soft at the edges at f3.8, this improved, peaking at f8 and then gradually dropping off to f22.
Vignetting was similar to that with both lenses at 70/75mm in that it was noticable at full aperture and again reducing at f5.6 and clearing completely by f8.

Vivitar 70-150 at 150mm

Nikon 75-150 at 150mm

Red fringing on Nikon lens at 150mm at f3.5
The 4 lens test
Obviously, using the four lenses on a DX sized sensor as fitted to the Fuji X-T1, vignetting was not an issue – I was more interested in the variations in colour balance and sharpness.
As previously discussed, both the Kiron and Vivitar lenses displayed a yellow cast, the Nikon lens was the most neutral and the Hoya lens somewhere in between.


Kiron 70-150mm Vivitar 70-150mm


Nikon 75-150mm Hoya 70-150mm
In terms of sharpness the Nikon was a fraction sharper than the other three lenses – who were equal in sharpness, although the difference would not be a deal breaker. Interestingly, when used on the Fuji X-T1, the Nikon lens appeared to produce overexposed images at the 75mm end of the zoom range – but correctly exposed a the 150mm end.

Kiron at 70mm

Vivitar at 70mm

Nikon at 70mm

Nikon at 150mm

Hoya at 70mm
Sample images

Nikon 75-150mm at f8 with adjustments made to highlights and shadows

Vivitar 70-150mm at f8 with adjustments made to highlights and shadows
Conclusion
Although three of the lenses were produced by the same manufacturer, there are differences – as previously mentioned there is a variation in stated maximum aperture between the Kiron and Vivitar lenses, although in practical terms it is unnoticeable. Both Kiron and Vivitar lenses have half stop clicks between maximum aperture and f16 and full stop to f22, whilst both Nikon and Hoya lenses have clicks a full stops only. All the lenses feel well built, however the Nikon lens suffers from zoom slip (it is a well known issue with this particular lens) this could be down to the lens being made to a price, although this takes nothing away from the optical quality of the lens. Whilst the Kiron and Vivitar have ‘macro’ setting, this is no more than close focus, although at 0.9metres it is hardly close focus, the Nikon focuses down to 1 metre and the Hoya brings up the rear at 1.5 metres. In terms of size and weight both the Nikon and Hoya lenses are longer and yet lighter than the Kiron and Vivitar.
The all important question is which lens to buy? On price alone the Nikon Series E lens nearly always cost noticeably more than the other three lenses, but colour balance and general build is close to Nikkor lenses if loyalty to manufacturer is an important factor, although the strange red fringing was a little worrying. Also worth noting is that third party Nikon F mount manual focus lenses are not as plentiful as other camera brands. The yellow cast with the Kiron/Vivitar duo can be easily corrected in post processing, although if taking photographs on transparency film the cast will be more obvious. It really is a case take your pick, any of these lenses will give you good results once stopped down a little.
-
STC Star Mist Clip Filter
In this, the third of the current series of STC filter reviews we are looking at the STC Star Mist Clip Filter.
As always, my thanks go to STC Taiwan for the generous provision of the Star Mist Clip Filter
What is a Star Mist filter? It is a filter designed to enhance highlights and increase halo effect without excessively impacting sharpness and contrast of the overall image, one of the reasons behind making the filter was that digital cameras can record an image of a night sky with stars appearing as pinsharp dot of light, the STC Star Mist filter creates a subtle glow around each star creating a more pleasing photograph, a second use of the filter is to create portraits with a soft glow in the highlights, whilst slightly reducing the contrast between highlight and shadow detail.
A little about the filter itself – like all STC filters, the STC Star Mist Clip Filter is supplied in a hard plastic case along with a STC branded anti-static cleaning cloth and a signed certificate proving the filter has been tested and passed all quality checks, this particular filter also come with a magnetic removal tool for those who feel uncomfortable putting their fingers inside their camera. The frame is made from aerospace grade aluminum alloy with an adonised black finish and the glass filter is double-sided hydrophobic, anti-smudge and antistatic coated, additionally the frame utilises a patented glass assembly to ensure the filter remains flat at all times irrespective of temperature fluctuations. In regards to the filter itself, to quote STC, they have ‘developed a filter that incorporates “sub-micron transparent microcrystals” used in liquid crystal processes to create a specialized mist effect.’ This particular filter is produced in two strengths, 1 being the weaker and 2 with a stronger level of glow and diffusion.
STC clip filters are unique in that they are inserted into the camera rather than fitted to the from of the camera lens, worth mentioning is that there are 2 variants of clip filter made for Sony full frame camera bodies – they are not interchangeable, make sure you purchase the correct one. As with all their clip filters STC state on their website that force should not be used when inserting the filter and if there is a problem to contact STC direct.

Test Procedure
The camera used for all the tests was equipped with a 35mm f2 lens and mounted on a Manfrotto 190 tripod with a ball and socket head, exposures were made in aperture priority, daylight balance, with ISO set at 200 and recorded as a RAW file. Images were viewed on a colour callibrated monitor. Photographs were taken late evening to take advantage of the low light levels. A series of exposures were made from ‘as’ metered to 3 stops underexposed to test the effect of exposure on the glow effect, both with filter and without.
Results


With filter Without filter


Underexposed with filter Underexposed without filter


Exposure adjusted with filter Exposure adjusted without filter


Glow effect at varying exposures with filter Glow effect at varying exposures without filter
Sample Photographs


Conclusions
Having tested the STC Star Mist filter at varying apertures with shutter speed adjusted accordingly, I noted that aperture size does not affect the amount of glow produced – whereas over and under exposure does make a difference. Although this becomes less obvious if the image is subsequently adjusted for density in post processing. It has been noticed however that sometimes by overexposing by a third to half a stop with the filter in place a pleasing glow can be created in the highlights, yet without the filter the image just looks overexposed with blown out highlights.
In my opinion, when a photograph taken with the STC Star Mist filter is processed as a black and white image the result looks as though it could have been taken on a film camera rather than a digital one.
A point worth mentioning is that as with all clip filters infinity focus changes, so if using a manual focus lens, do not set focus by the lens scale but focus through the eyepiece or on screen.
All STC filters are made using state of the art high grade materials and finished to a very high standard and this clip filter is no exception.
Do I recommend buying a STC Star Mist clip filter? If you want to give your night photographs and or portraits (did I forget to mention those?) an extra lift, then this is the filter for you. Mine now has a permanant place in my camera bag.
The STC Star Mist clip filter for a Sony A7 R IV costs in the region of $90/£90 and can be obtained either from STC Taiwan direct or from your local stockist.
-
STC Cine Mist CPL Filter
The filter in this review is a little different from the usual run of the mill filters you see around – it is a Cine Mist and Circular Polarising filter in one.
STC very kindly sent me this filter to review before it was officially anounced in the UK, hence I have been busy out and about using the filter under different conditions before writing this review.
What does a STC Cine Mist filter do?
To quote from STC direct – the filter delicately handles highlights, providing a natural and subtle softness without excessive effects. There is a gentle brightening in the shadow areas yet still maintaining contrast and producing naturally soft and clear images of cinematic quality without the overly sharp harsh effect that some high resolution digital devices produce.

As is standard for STC, the Cine Mist CPL filter is supplied in high quality square plastic case fitted with foam inserts, included is the STC lens cleaning cloth, UV test card plus a guarantee booklet that is signed by the technician who quality tested the filter. Like all STC filters the Cine Mist CPL filter is double sided anti smudge, anti-static and anti-reflection nano coating, it is also serial numbered to enable the user to register the one year guarantee. Worth noting is that all 3 STC filters use German made Schott B270 Crown glass.
To see how the STC Cine Mist CPL filter performs I tested it against 2 other STC CPL filters, – these being STC Hybrid CPL and STC Hybrid Pure CPL, plus a relatively unknown brand – this being a Zomei CPL. – The Zomei filter is multi coated and uses Japanese made AGC optical glass.
Test Equipment and Proceedure
For test purposes I have standardised by using a Nikon D800 equipped with Nikkor 24-85mm f3.5-4.5G ED mounted on Manfrotto 190 tripod fitted with 115 head. All exposures made using a remote release cable and the camera eyepiece cover in place.
Camera settings were: Standard colour, Adobe RGB Colour Space, Daylight balance, Contrast Normal, 0 exposure adjustment, Aperture Priority, Matrix Metering. All images were saved as RAW files.
The first 2 frames of each focal length test were made without a filter, then 2 exposures were made with each filter in place.
The first test involved photographing a gray target in bright early afternoon sunlight with each filter in turn – the purpose of this test was to check for any significant colour shift any of the filters. The camera was set at 400 ISO using an aperture of f8 and the focal length was set at 85mm. Exposures were made in aperture priority mode.

Without filter

STC Hybrid CPL

STC Hybrid Pure CPL

STC Cine Mist CPL

Zomei CPL
For the second test the photographs were taken late morning in direct sunlight, this time the ISO was set at 100 and the aperture set at f11 with a focal length of 50mm. This time 2 frames were taken at minimum polarisation of the sky and 2 frames at maximum polarisation.
Filters set to Minimum

Without filter STC Hybrid CPL STC Hybrid Pure CPL STC Cine Mist CPL Zomei CPL
Filters set to Maximum

Without filter STC Hybrid CPL STC Hybrid Pure CPL STC Cine Mist CPL Zomei CPL
Using a colour balanced monitor all the images taken were viewed in Adobe Camera Raw where the image and histogram of each file were examined for signs of colour shift and then the RAW files for each exposure were viewed at 100% in Adobe Photoshop – an image without a filter used was the baseline upon which all the filters were judged. At the same time I examined the Cine Mist files for its advertised effects characteristics.
Conclusions
Examining all the images side by side for colour variations it can be seen that the STC Hybrid Pure CPL filter produces a clean slightly cool image whilst the three remaining filters display a slight yellow/green shift, this is highlighted when the filters are used at maximum polarisation with the Zomei filter showing a stronger shift than the STC Hybrid CPL and the STC Cine Mist CPL. In practice and in isolation the colour shift is nowhere as obvious as the side to side comparisons.
The STC Hybrid CPL and STC Hybrid Pure reduce light transmission by half a stop, whilst the STC Cine Mist reduces light transmission by a full stop and the Zomei CPL reduced transmission by a stop and a quarter. Both STC Cine Mist and Zomei filters are full strength polarising filters whilst STC Hybrid and Hybrid Pure filters are 70% strength polarising filters. The 3 STC filters polarised light smoothly and evenly, the adjustment ring in all cases rotated smoothly with just the right amount of resistance, the Zomei filter made a good job of polarising – but the adjustment ring had a very obvious rough spots when rotated. All the filters maintain good sharpness when compared against the control image, the STC Cine Mist CPL filter give a very gentle softening, but it takes a very close examination to see – I would call it a very slight rounding of the image rather than softening, (this filter is listed as being 1/4 strength diffusion) STC also indicate that shadows are slightly brightened – again a very subtle effect and born out by my own trial images. I certainly like the results this filter produces.
Since I take a lot of landscape photographs I have tended to have either a STC Hybrid or STC Hybrid Pure CPL filter on my lenses almost permanantly, I have a feeling that they may have to take second place being replaced with the STC Cine Mist CPL filter. I thoroughly recommend the STC Cine Mist filter.
Sample Images


STC Cine Mist CPL Polarising effect


-
STC Aura UV Filter
Being a long term user and supporter of STC filters, I am always interested when a new STC filter is announced.
However before I get to the review, I must first extend my thanks to Ashley at STC for very kindly sending me the filter in question for me to test, along with several other equally interesting filters to review.
What is the filter and what makes it special?
It is a new generation UV Protector filter. According to STC’s website the filter is a world first and world thinnest 0.8mm filter glass.

The filter is made from new generation world thinnest chemical-strengthened 0.8mm single-crystal glass. The super slim lens is tough enough to withstand 700MPa, to prove this a 45g golf ball dropped on the filter from a height of 2.5mtrs, the filter was undamaged- impressive! In addition to this the STC Aura filter has lowest the Optical Path Difference in the industry – minimizing diffraction within the glass, thus enhancing edge detail restoration capabilities which is a must when shooting at 120 megapixels and 8k video. The filter is double sided anti smudge and anti-static nano coated. The filter ring itself is a rather fetching gunmetal coloured aluminium and is designed to be shockproof.
The STC Aura filter is supplied in high quality square plastic case fitted with foam inserts, also included in the package is a STC lens cleaning cloth, a UV test card plus a guarantee booklet that is signed by the technician who quality tested the filter. Also worth mentioning is the fact that all STC filters have a serial number on them, which is needed when registering the one year guarantee.
To get an idea of how well the STC filter performs I tested it against 3 other UV protection filters – these were: Hoya Pro 1 Digital UV, Kenko UV and STC Ultra Layer SMRC UV.
Filter Specifications:
Filter Thread size Coating Weight
Hoya Pro 1 Digital UV 77mm Multi Coated 35g
Kenko UV 77mm None 20g
STC Ultra Layer UV 77mm Multi Coated 17g
STC Aura UV 77mm Multi Coated 14g
Test Equipment and Proceedure
For test purposes I used a Nikon D800 equipped with Nikkor 50mm f1.8 D, Nikkor 24-85mm f3.5-4.5G ED and Nikkor 80-200mm f2.8 ED mounted on Manfrotto 190 tripod fitted with 115 head. All exposures were made using a remote release cable and the camera eyepiece cover in place.
Camera settings were: Standard colour, Adobe RGB Colour Space, Daylight balance, Contrast Normal, 0 exposure adjustment, ISO 100, Aperture Priority, Matrix Metering. All images were saved as RAW files.
The first 2 frames of each focal length test were made without a filter, then 2 exposures were made with each filter in place. Tests were made at 24mm with 24-85mm lens, 80mm and 200mm with 80-200mm lens.
All the filters were tested for their UV blocking capability using STC UV testing patches in bright sunlight.
Results
The first test performed was the UV blocking test – For this I used STC UV testing patches in bright sunlight.
The Hoya filter allowed a little UV through whilst the Kenko filter blocked very little UV and both STC filters blocked UV fully. The fact that the Kenko filter failed to block practically any UV light is to say the least a little worrying, admittedly the filter is the budget version offered by Kenko but still not an excuse.

Hoya Pro 1 Digital UV Kenko UV STC Ultra Layer UV STC Aura UV
The second test involved photographing a gray target in diffused early morning light with each filter in turn – the purpose of this test was to check for any significant colour and density issues with the filters. The camera was equiped with a Nikkor 50mm f1.8 D lens, aperture was set at f8 and exposures were made in aperture priority mode. Subsequently the images taken were viewed in Adobe Camera Raw where the image and histogram of each file was examined for colour shifts.
The colour shift test was performed by overlaying each of the histograms one at a time over the image taken without a filter.
All the filters darkened the blue mid-range very slightly – the Kenko filter additionally darkened the blue highlight range slightly, whilst the STC Ultra layer filter reduced the mid range blue peak slightly and also darkened red mid range by a slight amount, finally the STC Aura filter made a small reduction in the peak of the green mid range.

Without filter

Hoya Pro1 Digital UV filter

Kenko UV filter

STC Ultra Layer UV filter

STC Aura UV filter
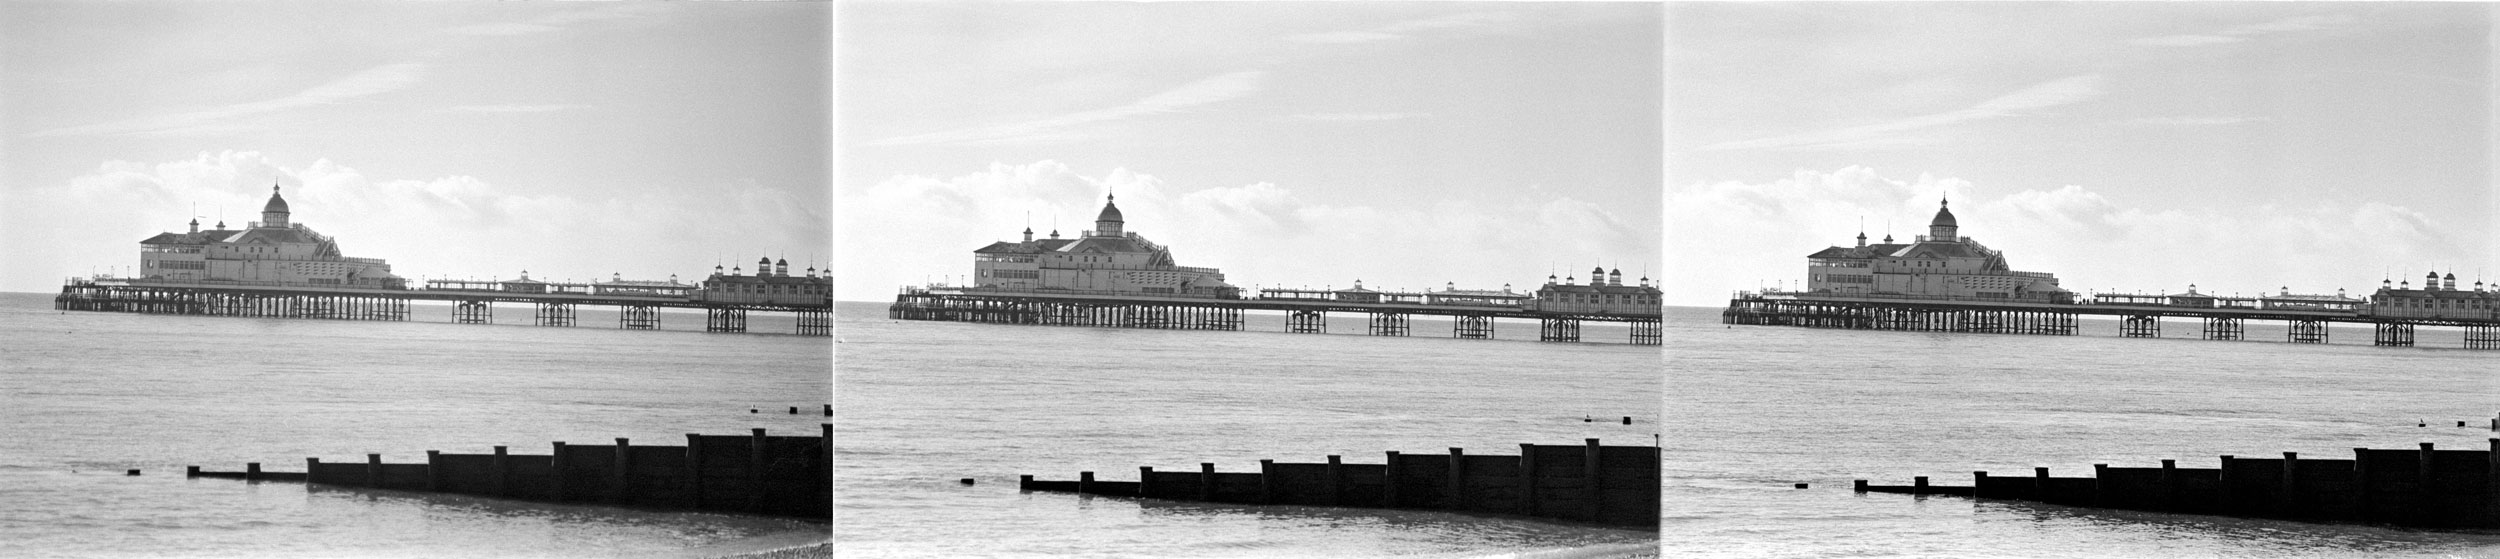
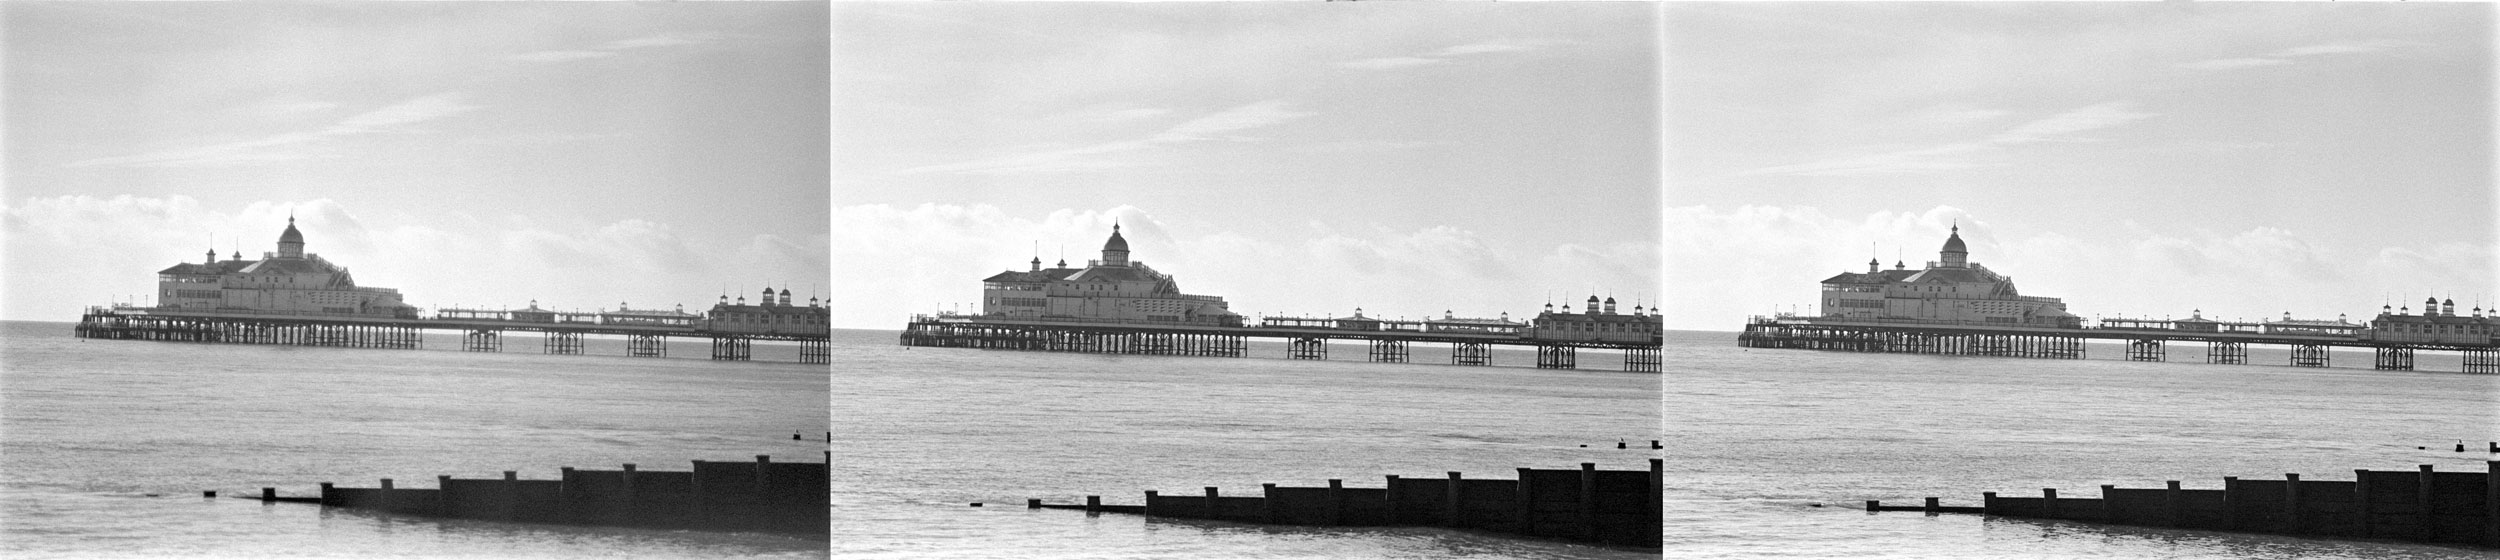
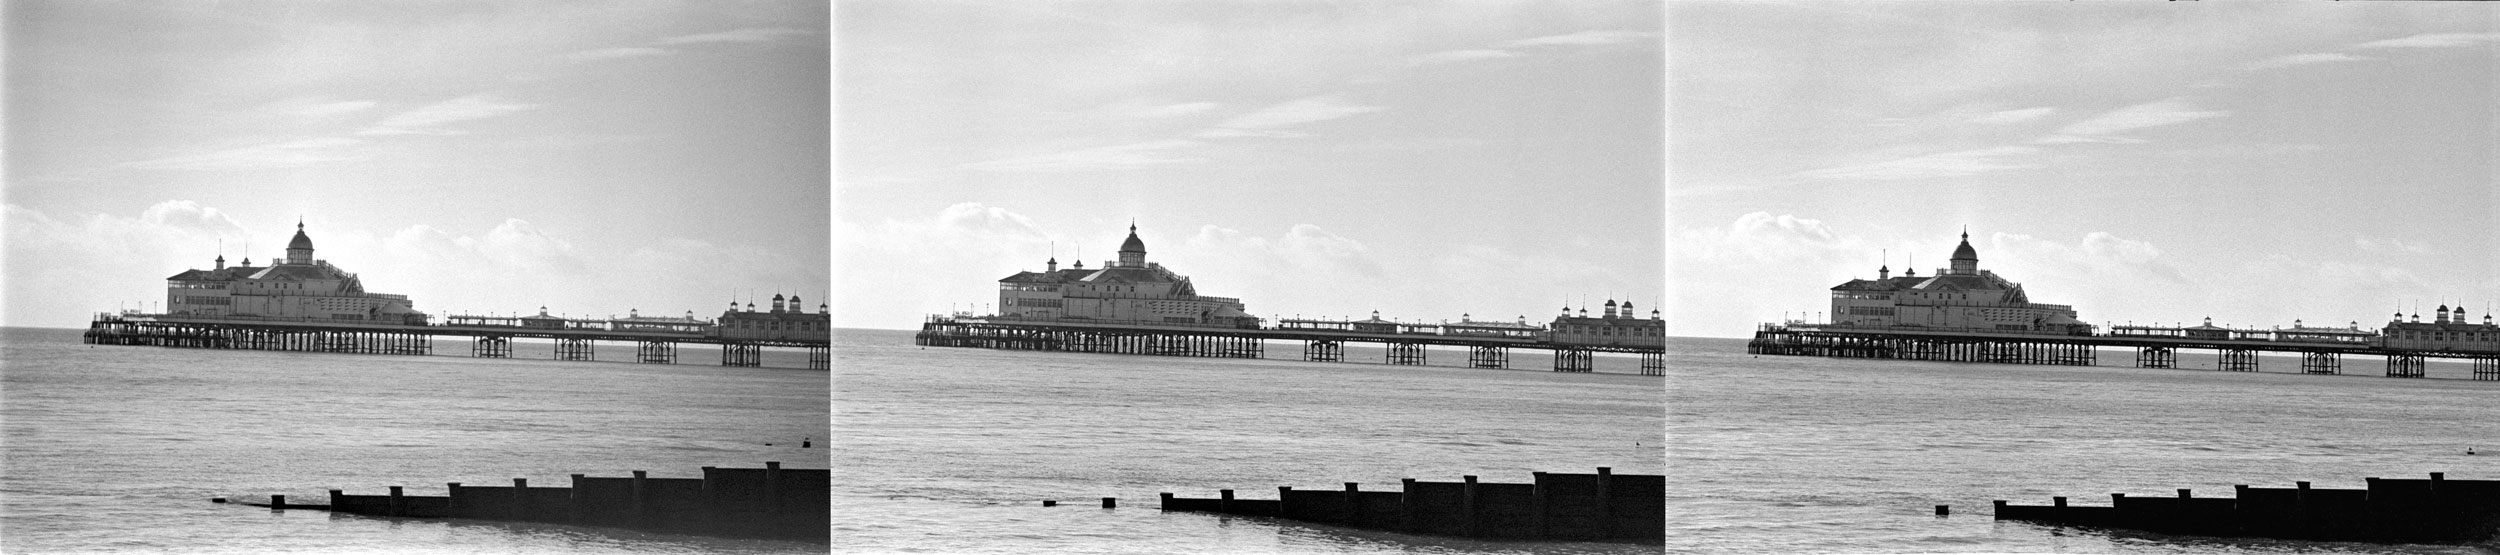
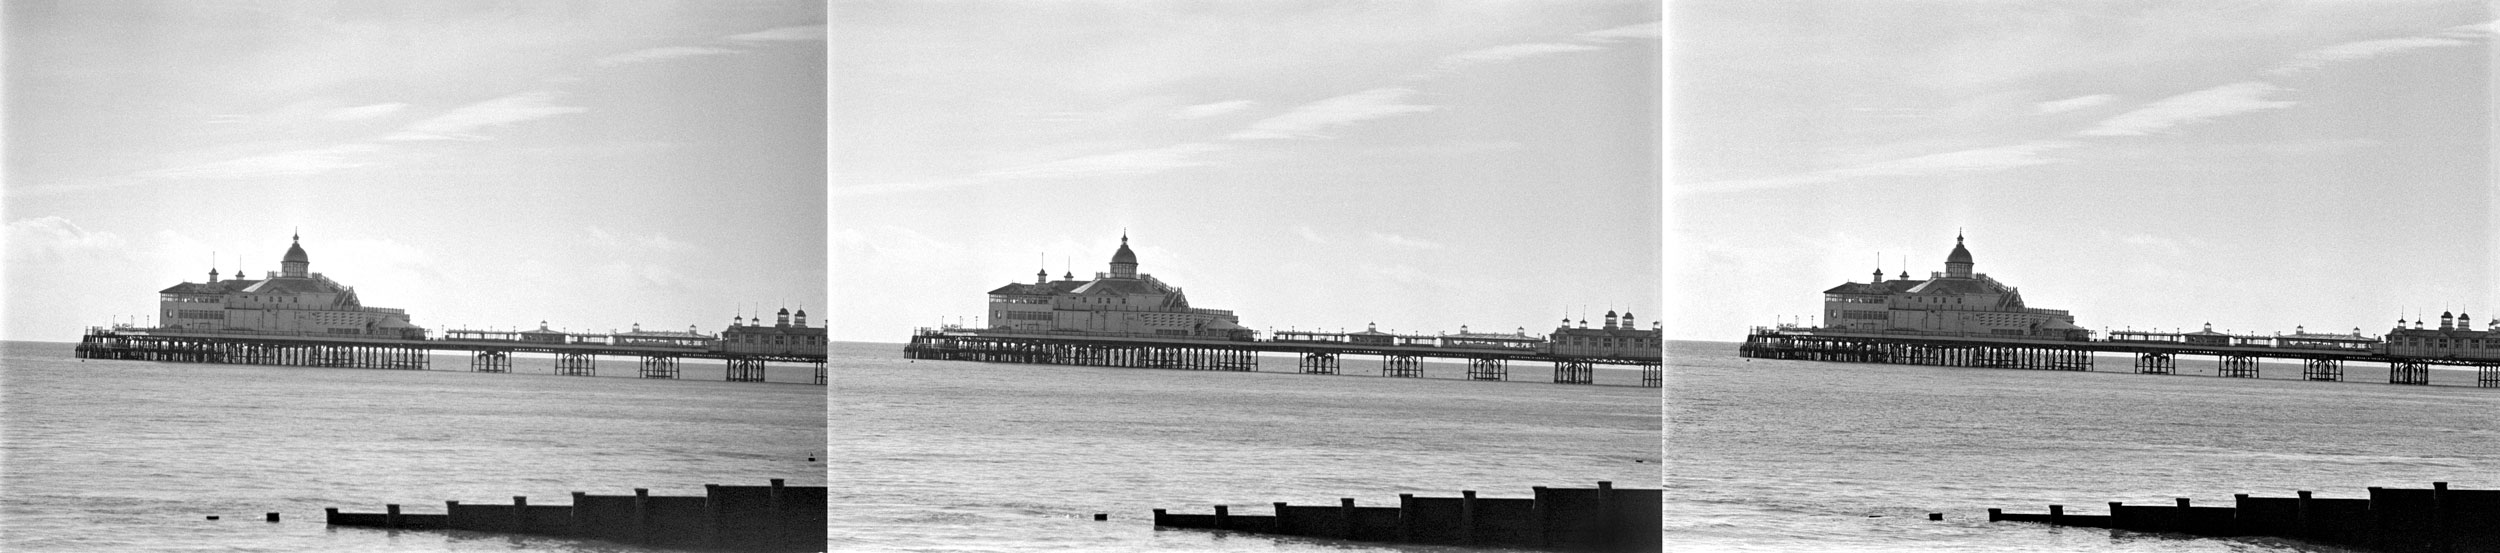
The third and final test was the sharpness test, this envolved making a series of exposures of Eastbourne Pier at 3 different focal lenghts with all four filters, the RAW files for each exposure were viewed at 100% in Adobe Photoshop using a colour balanced monitor – an image without a filter used was the baseline upon which all the filters were judged.
All images were saved as jpeg files in Photoshop without any corrections made.
From left to right images are: Without filter, Hoya Pro1 Digital, Kenko, STC Ultra Layer, STC Aura
 Nikkor 24-85mm at 24mm
 Nikkor 80-200mm at 80mm
 Nikkor 80-200mm at 200mm
Under critical examination the Hoya Pro1 Digital showed a very slight increase in contrast, Kenko filter was a little warmer, the STC Ultra Layer filter displayed a slight increase in contrast and a slight increase in edge sharpness, the STC Aura filter was similar to the STC Ultra Layer filter in contrast whilst giving a slightly better edge sharpness.
Conclusions
None of the filters tested displayed a huge colour shift, which is not unexpected. Formulation of the glass and coatings used to enhance light transmission will always make extremely slight differences, but only close comparison of the histograms reveal this.
Coating of the filters also play an important part in maintaining image sharpness and contrast, however the thickness of the glass also has a part to play in this – thicker glass will diffract light more than thinner glass. This is where the STC Aura filter comes into it’s own, being a world first thinnest single crystal optical glass filter- allied to state of the art coatings. It helps to produce very sharp images with excellent contrast.
Surprisingly when comparing weight between the four UV filters, I was half expecting the Kenko filter to be the heaviest, how wrong I was -it weighed 20g a full 15g less than the Hoya Pro1 Digital. The STC Ultra Layer filter tipped the scales at 17g and the STC Aura filter came in at only 14g.
More worrying was how little UV light Kenko’s budget filter blocked (according to the test- none). To be fair to Kenko, there are other multicoated UV filters in their range which probably make a better job of blocking UV light but for the purposes of this test I wanted to test a recognised budget filter from a known brand (Kenko are part of the Tokina group) rather than one of the ‘No Name’ brands that are on offer at various outlets.
What you expect from your UV filter and how much you want to spend will certainly dictate which filter you opt for.
If you want an inexpensive piece of glass to put in front of your lens then the Kenko filter is for you, just remember that it does not effectively block UV light. A better but obviously more expensive filter would be the Hoya Pro1 Digital, this filter made a better job of blocking UV light. The ‘Digital’ in it’s description aludes to the fact that the multicoating have been optimised for digital camera sensors. Top marks go to the STC filters, with the Aura filter making it to the top spot due to the better edge sharpness it produced. I tested all the filters with a 36.3mp camera, so imagine the image quality the STC Aura filter will produce at twice and four times that!
Further evidence to how robust the STC Aura filter is can be born out by personal experience – I accidentally dropped my filter onto concrete from at least a metre high, the filter was completely unscathed.
Prices of all four filters are subject to change, but as a rough guide for a 77mm filter : The basic Kenko UV filter costs on average £6.00, whilst a Hoya Pro1 Digital UV filter (now superceeded) or equivelant costs in the region of £73.00, STC Ultra Layer UV filter costs approximately £65.00* and STC Aura UV filter approximately £85.00*
* Prices converted from USD – Please contact UK suppliers for exact prices.
The final question is: What UV filter would I choose? Easy answer – the STC Aura UV filter, in fact I am already using one, it’s top quality!
Sample Photographs


-
Going wider still!
As mentioned in an earlier article about my home built 6×12 panoramic camera, I said that I was considering constructing an even wider panoramic camera, a 6x17cm camera. Well here it is!
I have retained some tried and tested materials and construction methods, namely plywood construction and a basic box shaped body. This time however I cut the body from a sheet of 6mm plywood rather than buy a box pre made and then modify it to suit. I departed from my original construction method, by lining the interior of the camera body with adhesive foil which was then sprayed matt black rather than coating the exterior with foil and spraying matt black.

Basic construction – The first steps
The film chamber was constructed in a similar method to my 6×12 camera,(this was made from a surplus picture frame), I used backing paper from a used 120 roll film to ascertain the dimensions of the film guide, I wanted it as wide as possible whilst still supporting the film. Every surface of the film plane had to be perfectly flat and smooth to ensure the film emulsion did not get damaged when being moved across it, the outer edges were curved down to prevent damage to the film emulsion.
Having completed the initial construction, the film chamber was given a coat of matt black paint. The next stage was to cut a hole in the front centre section of the camera to allow the lens to project into the camera body. A smaller box section was then constructed, this would be fixed to the front of the camera body to hold the lens. Tests were made with paper negatives to check for correct lens to film plane distance. It was at this point I discovered that the Georg Leitmeyer 90mm Angulon (a Schneider Angulon rebranded by the looks of it) that I had obtained would not fully cover a 6x17cm image area – somewhere at the back of my mind I thought it would just about cover the area required, hence I had to purchase an alternative lens – this being a Schneider 90mm Super Angulon.
I made the film advance shafts from steel bolts that were ground at one end to form a T that would locate in the film spool to enable the film to be advanced, holes were drilled in the top of the camera body to accept the winder shafts. Steel washers were fitted inside and outside the body to provide further protection against light leaking into the film chamber and causing fogging. The lower film spool retaining guides were again made from steel bolts inserted through the base of the camera body. A steel spring and washer were used to provide downward pressure to hold the winder mechanism inside the film spool.

Film winder
Originally the camera back was designed to be thinner than my 6×12 cameraback and again fit inside the camera body to form a light tight seal, subsequent tests revealed that the thinner back construction did not provide an adequate seal, as a result the camera back was modified to overlap the camera body by 10mm all round – this has proved to be much more sucessful.

Modified camera back – note red window for frame registration

Camera back with cutouts for winder knobs
The winder knobs were constructed from a section of wooden broom handle – they were trimmed down, drilled to accept the winder shaft and fitted with brass caps.

Interior view with film transport in situ
My original plan had been to use the natural wood finish for the camera, but after some consideration I decided to opt for matt black instead since it highlighted the brass fittings and gave the camera a better overall look.

The finished camera
Initial test for light tightness, focus, film advance, frame spacing and coverage were made using Fomapan 100 and 400 film. This was when I discovered the suseptability of scratching with Fomapan film, hence the reason for adding an additional protection layer – in this case the reverse side of 120 film backing paper to both film guides. Indicators in the form of small white beads have been fixed to the camera to give an approximate guide for framing the image. Also a quick release plate has been fixed to the bottom of the camera for ease of fitting the camera to a tripod. Once these final details had been sorted it was time to take some proper photographs! Some samples are shown below.
Some final thoughts.
My initial plan was to reuse my Schneider 90mm f6.8 Angulon as used on my Intrepid 4×5 and my home built 6×12 cameras, unfortunately it only covers just over a 5 inch (125mm) circle of coverage, hence the need to use a Super Angulon as these have a much larger circle of coverage – in addition this negates to a large degree having to use a central density filter to even up exposure across the image.
The lens has been set using hyperfocal distance to obtain maximum depth of field at a minimum aperture of f11, although I generally use a minimum aperture of f22.
Also 6×17 proportions do not work for every subject, it is better suited to landscapes and wide vista photographs. Another major consideration is that a 120 roll of film will only yeald 4 frames per roll, so no room for error. For those who are interested the frame numbers used on a 120 roll of film, are the central set and using numbers 1, 4, 7 and 10.
All things considered I have had a great deal of fun (and some head scratching!) constructing my 6×17 camera and I can now look forward to taking plenty more photographs with it.
Sample Photographs


-
My journey back to large format.
This post as the title suggests is about my return to large format photography.
First a little background information to set the scene.
When I first started in professional photography more than a good few years ago! I was introduced to the world of large format photography in the form of the MPP 5×4 Micro Technical camera – it was a solid piece of kit. As well as a ground glass rear focusing screen the camera was equipped with a range finder focusing capability, although this only worked properly if the correct cam linkages were fitted for the relevant lenses.
Whilst I was at college I had access to a Sinar monorail camera, this in turn had a greater amount of lens and film plane movements available to it due to the design.
Fast forward to the early 21st Century.
Having over the years changed employer several times and finally set up a retouching studio within the offices of Protech Repairs, I was in conversation with Kelvin from Protech about the joys of large format photography. This in turn got me thinking about making a return to large format photography.
Initially I considered the idea of making a 5×4 camera from scratch, but this was soon decided against due to the cost of the component parts – focus bellows, making a focusing rack, film back and of course material to make the camera body. Enter that well known auction site eBay. I was browsing on day when I came across a gentleman selling a almost complete homemade 5×4 camera, minus lens. I bought it, having worked out that it would be a lot less expensive for me to finish building the camera myself.
Views of underside of camera – note how well engineered it is.


Underside view Side view Rear view
Once I got the camera I set about making some changes – firstly I reduced the size of the camera body (it was constructed from aluminium), this involved dismantling the camera body which was beautifully drilled and bolted together and cutting the framework down to about half the initial length. The next step was to make some changes to how the focusing rack assembly was fixed to the camera body, as you can see by the photograph there was a lot of aluminium used! My original plan was to attempt to make an adjustable rail assembly, although it worked in a fashion it was not wholly ideal. Several attempts later a fixed arrangement was decided on. Following on from this I constructed a pan and tilt/rise and fall lens mechanism, for this I used a camera flash bracket bolted onto the focus rail and the lens panel. Finally came the most challenging part; the building of the film back – this consisted of a focusing screen and dark slide holder. The film back was required to rotate through 90 degrees to enable both vertical and horizontal photographs to be taken and at the same time the screen had to move backwards to enable the dark slide to sit in the focus plane to take the photograph.
As chance would have it I had an old studio camera in my loft that had such an assembly on it, this was used as a donor to make the 5×4 film back, whilst it worked in a basic way, there were subsequent problems with keeping the dark slide in place whilst taking a photograph (the dark slide would sometimes slip out of position causing an alignment issue and on occasion fogging).

Early focus rail support and film back
The lens board was of a unique size and whilst one came with the camera, extra ones were needed for additional lenses. I made several boards including a recessed board for use with a wide angle lens from thin plywood and heavyweight card – these in turn were sprayed matt black to prevent reflections.
A completely redesigned film back was created to prevent dark slide alignment problems and this has proved to be very satisfactory.
 Final focus rail design and redesigned film back
The camera is not without flaws these primarily – the weight, it weighs in at 3 kilos, (quite a chunk to carry around for a day) and in addition the lack of compactability – the focus rack not folding up as the MPP camera does, makes quite cumbersome. On the plus side the camera is very solid in construction.
Subsequently I have purchased an Intrepid mk4 camera, this is quite considerably lighter since it is primarily constructed from marine ply, it also folds down thus taking up a lot less space. The Intrepid is not without a few flaws, although most of these have been rectified either by me or Intrepid Cameras thanks to their lifetime guarantee.

Intrepid Mk4 5×4 camera
This may sound as though I have given up on my original camera, although I have not. I still use it on occasion and I still have further ideas on how to make it lighter and more compact, it’s just a matter of finding the time!
Processing 5×4 sheet film
I originally processed my sheet film in a standard Patterson 120 sized film processing tank using what is called the ‘Tapas Method’ – this entails curving the film with emulsion side inward and securing with an elastic band, using this method 4 sheets of film can be processed at one time. If using this method remember to still use the centre column that normally supports the processing reel otherwise the film will be fogged. I have now moved on and use MOD54 processing reels for sheet film, these however require a larger processing tank to be used but I can process 6 sheets of film at once.


Single sheet – Tapas Method 4 sheets in processing tank – Tapas Method Patterson tank with MOD54 film holder
Why do I enjoy large format photography?
The reason I enjoy taking large format photgraphy is because, it makes one slow down and consider the view and composition of the photograph before making the exposure rather than taking a bunch of frames on a digital camera and later editing them down to the best frame, this in turn leads to taking more meaningful photographs due to the constraint of how many photographs can be taken in on session rather than what has euphemistically become known as ‘spray and pray’ with digital. Add to this the ability to control the plane of focus combined with perspective control, all this and amount of detail that can be captured on a large sheet of film, sheer bliss!
Sample photographs


I should like to extend my thanks to the following people without whom this article would not have happened:
George P King Ltd – My first employer who introduced me to large format photography.
Cliff for making the original camera in this article.
Mark for his encouragement and badgering to get the project finished.
My wife Sara who puts up with me lugging bags of camera kit around when we go out for the day
Kelvin and Jo at Protech Repairs for the generous supply of donor material and encouragement to ensure the project did actually get finished. -
Making a panoramic roll film camera
The camera mentioned in the title came about as the result of a comment made to me by a good friend of mine.
It all started when I was directed to the fact that a local large format camera maker was producing what could only be described as a half dark slide for 5×4 film dark slides. The concept enables the user to take 2 images approximately 6×12 cm on a single sheet of film.
I took a look at the item and it got me thinking. I could see a couple of issues, firstly keeping track of which position the half slide was in when making an exposure, secondly taking care when taking both 6×12 cm and full 5×4 inch images in the same session, thirdly the cost of half a dark slide and finally the availability of 5×4 film.
Whilst I like the 6×12 format, I felt that there must be an alternative. Since I already have 2 pinhole cameras that make images in the 6×12 format an idea started to emerge. How about building a camera and using a large format lens that I already own? Another point worth mentioning is that a manufactured 6×12 camera of any quality comes with a hefty price tag, so a homemade camera made a lot of sense if it could be built inexpensively.
A short while after, the idea still floating around in my head, I happened to be in our local branch of The Works with my wife, I spotted a large plywood box that had been discounted due to a minor fault and voila! The basis for a 6×12 film camera.
Using my Noon 6×12 pinhole camera as the inspiration and basic template for the new camera, I set about making the main body of the camera – this involved cutting the newly acquired wooden box approximately in half and reusing a section for the top plate and create a solid rectangular body.
Perhaps I should mention at this point that I rarely commit measurements and drawings to paper, I tend to work it out in my head then start work! This is what is commonly called ‘My rule of ish’
Having previously fitted the lens I intended to use to my 5×4 camera body and set the focus to infinity I measured the overall depth that was required for the new camera to enable the lens to be focused at infinity.
The next stage was to create the film chamber, (this was made from a surplus picture frame), I used backing paper paper from a used 120 roll film ascertain the dimensions of the film guide, I wanted it as wide as possible whilst still supporting the film. Every surface of the film plane had to be perfectly flat and smooth to ensure the film emulsion did not get damaged when being moved across it, the outer edges were curved down to again prevent damage to the film emulsion.

The film chamber and winder assembly
After this the back of the camera was assembled, I decided to make it so that it fitted inside the main body of the camera to prevent light from leaking onto the film inside. A film pressure plate was then made to hold the film flat in the film chamber and against the film mask.
Next came the tricky part, that of making sure the lens was focused at infinity at the film plane. This entailed cutting a hole in the front of the camera body for the lens to be placed over and fixing a focusing screen in the film chamber on the actual film plane, then it was outside with a dark cloth and a ruler to verify the distance the lens had to be placed at. – Back to The Works for another much smaller box!
I intended to use a 90mm Schneider Angulon lens and as this had already been fitted to a lens panel and already included an additional modification I wanted to keep the lens on the panel to enable me to also use it on my 5×4 camera without having to reassemble the modification each time, so having obtained another plywood box I set about reshaping the front to hold the lens panel whilst still making it possible to remove easily when required – the design of it similar to that used on other large format cameras.
Before I could put a roll of film through the camera a very important step – Make a film transport assembly. The idea was to have fixed locating pegs on the of the film chamber and a winder assembly at the top. I found some bolts of the correct size to locate inside the film spool to hold it in place for the bottom and for the winders I cut ground down some longer bolts to make them thinner and shorter. The winder bolts had a slot cut in them, into which a small flat section of metal would be wedged. Before this; winder knobs were made from a small section of broom handle, a hole drilled through the centre for the bolt to fit, in turn a small hole was drilled through the knob and bolt into which a small pin was forced to enable them to turn as one. Parallel holes were drilled top and bottom on both sides of the camera body into which the bolts were fitted. Packing blocks were fitted inside the camera at the bottom to hold the film spool in the correct position, at the top the bolts were pushed through a short section of spring was added then a tap washer pushed over the bolt to keep the spring in place and finally flat sections of metal were wedged in – the purpose of these are to locate in the top of the film spool to enable the film to be advanced. At this point I also added a tripod bush fitted into a piece of 5mm ply to the underside of the camera.
The next stage was to use a 120 film backing roll to create the start point ie. frame 1 marked on the backing paper (note that 6×6 and 6×12 framing uses the central numbers on the film roll) was calculated and a hole drilled through the camera back and pressure plate, a section of red film was sandwiched between the back plate and the pressure plate to enable the film numbers to be seen when advancing the film.
Having glued and secured all parts of the camera body together, it was time to dust out the interior and give the insides of the camera a coat of matt black paint to reduce risk of internal reflections.
At this point I should mention that to produce 6×12 images the film is advanced to uneven numbers to obtain the correct spacing, ie 1,3,5 etc.
Time to load the camera and take some test photographs.
The first images were not good, apart from a miscalculation of frame spacing there was a large amount of overall fogging present. This was going to require a little more work!
Frame spacing was easily solved by adjusting the frame start point – a new hole was drilled to more accurately observe the frame numbers on the backing paper.
I deduced that the fogging was caused by the use of thin ply on the front of the camera – since the internals of the camera were now fixed in place, the solution was to cover the outside of the camera body with adhesive aluminum foil, not pretty since my initial idea had been to have a dark wood exterior on the camera but at least it was now light tight.

Lightproof aluminum foil applied to front
The second test roll of film showed a lot more promise, no overall fogging but there was a light leak causing a streak across the top of the image including what should have been the unexposed edge of the film.
At this point I added extra light absorbing baffles inside the camera plus some thin light seal foam around the camera back. Up until this point the camera back had been held in place with a couple of elastic bands.
Time for a third test roll, this time success! Time for some tidying up. The camera body and back was covered with a matt black adhesive plastic purchased at a bargain price from a local supermarket, 2 small brass finish clips were fastened to the backplate and camera body – no more rubber bands!

The matt black finish
Testing now complete – Time to apply the final finish in the form of a wood veneer to enhance the overall appearance of the camera, lens panel and back panel were given a matt black detail finish. The veneer was stained to enhance the grain and given 2 coats of wax polish to help waterproof the camera body.

The final wooden finish

Rear of camera with frame count viewer

Top view – winder surround detail added
Sample images
All sample photographs were taken on Kodak Tri X film and processed in 510 Pyro developer.


Conclusion
This has certainly been an interesting experience. If I were to make another panoramic style roll film camera and yes I am considering it! Maybe even a 6×17 format camera, I would make the front of the camera of thicker material and lightproof the interior of the camera rather than the outside that way I could have a polished wood exterior from the outset. In addition to this I would also permanently fit a lens to the camera rather than make it removable.
Watch this space!
-
STC Pure Hybrid CPL Filter
STC recently announced the release of a revision of their well known Hybrid CPL (Circular Polarising) Filter.
What is the difference between the ‘New’ Pure CPL Hybrid filter and its predecessor? According to STC the new filter has a more neutral colour balance.
I have used the original STC Hybrid CPL filter for some years now, so was interested to see the difference between the two filters for myself. As a result I obtained a STC Pure Hybrid CPL filter and put it to the test.
What makes the STC Pure Hybrid CPL filter special?
Made with Schott B270 super tough glass, has a double sided anti reflection, antistatic, oil and waterproof coating, the filter edge is black rimmed to reduce reflection from the edges of the filter, the filter rings are Teflon coated to ensure smooth rotation in addition to this a special polarising film is used . All in all this makes for an ultra light and ultra slim polarising filter which also cuts UV light.
Being a Hybrid filter it cuts light transmission by only 1/2 a stop whilst giving a 70% polarising effect.

The filter is supplied in a square hard plastic padded case, also included are a high quality lens cleaning cloth, a UV test card (to prove how much UV light the filter blocks) and a certificate of accreditation– STC filters are individually numbered, this identifies the filter when registering to activate the guarantee.

How the filter was tested.
For comparison purposes both the STC Hybrid CPL and STC Pure Hybrid CPL were fitted to a Nikkor 24-85mm f4.5 – f5.6 AFG lens on a Nikon D800 camera body. The combination was mounted on a tripod, using a remote shutter release. Exposures were made in Aperture Priority, using an aperture of f11, metering was set to Matrix, 100 ISO, Neutral saturation and Daylight balance, files were saved as NEF and converted to Jpeg for website use in Adobe Camera Raw without adjustment.
The NEF files were examined at 100% in Photoshop on a colour calibrated monitor.
Making the test images
Exposures were made without filter and at full polarisation. The filter ring was rotated several times on both filters to ensure that the full polarisation effect was used..The Teflon coated filter rings made rotation smooth with just the right amount of resistance.
When using full polarisation underexposing by 1/2 a stop sometimes helps compensate for the darker blue sky causing the camera to overexpose.
All photographs were taken in full sun from between 11.00 and 4.00
Test Images
Colour saturation

Without filter Original Hybrid CPL filter Pure Hybrid CPL filter
Notice the difference in the RGB channels in the example screen shots below
 Without filter
Original Hybrid CPL filter

Pure Hybrid CPL filter

Without filter Original Hybrid CPL filter Pure Hybrid CPL filter
Polarisation

Without filter Original Hybrid CPL filter Pure Hybrid CPL filter


Without polarisation Polarised with Pure Hybrid CPL Filter


Without polarisation Polarised with Pure Hybrid CPL Filter
Colour difference between filters


Left – Original Hybrid CPL filter colour balance Right – Pure Hybrid CPL filter colour balance
Results
As can be seen by the above screen shots the colour rendition between ‘Without filter and Pure Hybrid CPL filter’ are quite evenly matched and more neutral, whereas the original Hybrid CPL filter shows a slight cyan cast. Sharpness with or without either of the two Hybrid CPL filters is unaffected, nor is there any evidence of fringing thanks to the ultra slim high quality Schott glass and multi coating used. The Pure filter also makes a very good job of blocking UV light – see the examples below for further proof.

STC Ultra layer UV filter STC Pure Hybrid CPL filter

STC Ultra layer UV filter STC Pure Hybrid CPL filter
Conclusions
When viewed on screen photographs taken using the Pure Hybrid CPL filter are clearly neutral, combined with only a 1/2 a stop light loss, excellent polarisation properties and being ultra slim profile and light in weight, add to this the fact that the filter is excellent at blocking UV light – this new version of Hybrid CPL filter ticks all the boxes.
I keep a STC Hybrid CPL filter on my camera lens most of the time, the minimal light loss is hardly worth bothering about, plus it has the advantage that I have instant access to a polarising filter should the need arise.
This filter is a premium product so expect to pay around £138 for a 77mm Pure Hybrid CPL filter.
Would I recommend the Pure Hybrid CPL Filter?
Short answer -Yes! The STC Pure Hybrid CPL filter will be my main filter from now on.
Extra Sample Images

STC Pure Hybrid CPL filter

Combination of STC Pure Hybrid CPL filter and STC ND 1000 clip filter
Thanks go to STC and their UK distributor InfinityX for supplying the new Pure Hybrid CPL filter for the purposes of this review.
As an extra incentive to purchase a Pure Hybrid CPL filter (or any other STC filter) there is a special 10% discount to be had when you add the discount code: 2023tpfp10off at the checkout through the link below.
https://www.stcoptics.com/discount/2023tpfp10off
-
STC Infra Red Clip Filters
The sun has now started to appear on a near daily basis now. That can mean only one thing!
Time to break out the Infra Red filters!
I should start by thanking our good friends William and Ashley at STC Optics for kindly providing the filters used in this review and Protech Repairs for converting the Fuji X-E1 to a full spectrum pass filter.
In this review I will be testing 4 STC clip filters – 3 Infra Red pass filters consisting of: 590nm, 720nm and 850nm, in addition to this I will be testing a 650nm UV/IR cut filter.
The frames of STC clip filters are made from black anodised 304 stainless steel which is virtually non magnetic, the glass itself is a mere 0.5mm thick and has a special nano coating to prevent dust from sticking to it.

First the basics – Infra Red pass filters allow the transmission of infra red light at varying wave lengths – the higher the number the less visible light is allowed through. A UV/IR cut filter on the other hand cuts out both UV and Infra red wave lengths – in the case of the STC clip filter, it absorbs UV light from 650nm. When fitted to a full spectrum pass converted camera and set to daylight balance it effectively becomes a regular camera suitable for general photography once more. (I used this particular set up when on holiday this year to reduce the number of cameras carried.)
How to use the clip filters with a Fuji mirrorless camera.
When using infra red filters of any kind the camera must first be adapted for use with infra red filters – this usually involves having the hot filter (this blocks infra red light) removed and replaced with a full spectrum glass. Warning – do not attempt do do this yourself, if something goes wrong you could be left with a very expensive paperweight! Contact a reputable company to undertake the process. – See link at bottom for my personal recommendation.
Installing the filter
When using the clip filters for a Fuji mirrorless system for the first time, be aware that on the reverse side of the filter the two outer edges have a sticky layer, this is revealed by removing the clear cover layer.
Remove the camera lens and place the filter into the throat of the camera, ensuring the lettering on the filter is facing outwards – most of the STC clip filters will only fit one way up with the exception of the Fuji filter , this will fit upside down, but with lettering outward. Very gently press the outer edges of the filter to ensure the sticky layer make contact, replace the lens.


Inserting clip filter Clip filter in position
Before taking a photograph a custom white balance must be made. This is done by first setting the camera to ‘Custom White Balance’, (the exact method of making a custom white balance vary with each camera model, consult your camera manual for further guidance.) Typically a 590nm balance is created using a white sheet of paper, for 720nm and upwards the white balance is done using green foliage as the neutral point.
The setup
For this review I used a full spectrum converted Fuji X-E1 plus a conventional Fuji X-T1 as a bench mark for daylight colour balance. Two lenses were used – the lake images were taken using a Meike 12mm f2.8 manual focus lens, the broken wall images were taken with a Andoer 35mm f1.8 manual focus lens. Custom white balances were made and set prior to taking the photographs, lenses were stopped down to f8, shutter speed set to Auto and sensitivity was 200 ISO. In both sets of tests the camera used was fitted to a tripod. All images were saved as Jpeg fine, large and 3:2 ratio. Focus confirmed prior to exposure. Lighting conditions were bright and sunny. It is worth remembering that Infra red light focuses at a different point to the visible spectrum, so ignore the fact that when focusing the point at which infinity is sharp will not align with the infinity mark on your camera.
Test images
The Lake photographs are shown in ACR (Adobe Camera Raw) to illustrate the wavelengths of light each filter passes.

590nm pass filter

720nm pass filter

850nm pass filter

Converted Camera set to Daylight balance – No filter

UV/IR Cut Filter – Camera set to Daylight balance

Unconverted Camera set to Daylight balance – No filter
Wall and doorway

590nm pass filter

720nm pass filter

850nm pass filter

UV/IR Cut Filter – Camera set to Daylight balance

Unconverted Camera set to Daylight balance – No filter
Additional Sample Images


850nm Pass filter – Image converted to Black and White 850nm filter – No Adjustment


UV/IR Cut filter in converted camera – Daylight Balance UV/IR Cut filter in converted camera – Daylight Balance
Conclusions
All the photographs were opened and examined at 100% in Adobe CC on a colour profiled monitor, no alterations were made, the images are just as they came from the camera. The images were observed to be sharp from edge to edge and free from distortion and fringing.
The photographs taken with display more detail in the shadow areas compared with the full colour images, it is worth noting that there is a colour balance difference between the images taken with the UV/IR Cut filter and the unconverted camera, this could be down to the amount of UV/IR being blocked by the clip filter compared with a lens without a UV filter and also the variance between the sensor arrangement of the two cameras used, in saying that either of the colour images is perfectly acceptable when viewed on its own.
The all important question is. Do the STC clip filters offer value for money? For a Fuji X series APS-C prices range from £96.99 for a single STC clip filter infra red filter (including case) to £111.99 for the UV IR Cut filter.
Whilst this might appear expensive at first glance, consider the cost of purchasing a filter for each lens you wished to use and in the case of ultra wide angle lenses that have a protruding front element fitting a filter is not possible.
Taking all this into account, the STC clip filter range offer excellent quality and great value for money. I own a number of STC clip and screw-in filters and would not be without them.
STC are unique in the range of clip filters that they offer, fitting cameras from Nikon Z series to Pentax APS-C and most cameras in between.
Update : STC Optics are offering readers of this blog a special discount on all their filters. Use the link below and add the discount code: 2023tpfp10off at the checkout.
Filters can be purchased direct from STC OpticsFor further information on Infra Red conversions contact Protech Repairs
-
Back to Basics
Have you ever noticed on TV and films how often a photograph is portrayed as being taken with an incorrect lens – amazing close ups from an impossible distance with a standard lens? Or how about the well lit photograph taken in near zero light? Or how about one of my pet gripes holding the camera completely wrong? (I often see the last one when out and about.)
I cannot do much about the first two items, but I can give some advice on this post about the last one.
Part one – Holding the camera correctly.
Do not grip the camera by the sides with both hands, this makes the camera unstable. Instead, hold your camera with your right hand by the grip on the right side (most cameras have a molded grip) place your left hand under the lens and tuck your elbows in to your chest, this forms a triangle which makes the camera a lot more stable and less prone to camera shake.


Incorrect grip Correct grip
Part two – Focusing correctly.
When focusing or zooming a lens do not hold the lens on the top of the focus or zoom ring – this again makes the camera unstable due to the possibility of applying downward pressure. As with the correct holding position make your adjustments from the underside of the lens, this again in forming a triangle makes for a more stable arrangement.


Incorrect method of focusing Correct method of focusing
Although the illustrations in this post show the use of a film camera, the same principles apply to digital SLR cameras. If you have a viewfinder use it, on a tripod the rear screen can be used. I have seen more than a few people using the rear screen whilst hand holding the camera, not an easy thing to do! ( It is not a mobile phone!) This can once again lead to camera shake. In camera / lens stabilisation can correct for camera shake, it is designed as an aid to producing sharp photographs. However, good technique is better than relying on technology to correct for bad practices.
Gripe over! I hope this post offers some guidance.
-
A Tale of Two TLRs
What follows is a test of two TLR (Twin Lens Reflex) cameras, but first a little background information.
I already own 2 TLR’s. – When one started to have problems with the shutter mechanism I switched to my second camera and soon after it too was having shutter problems, knowing that it might be difficult to get either repaired due to parts no longer being available I started looking out for a replacement. I found a Chinese made Seagull WWSC for sale at a very reasonable price, so I purchased it. Then a couple of weeks later I was browsing a local junk shop when I spotted in the corner of a display cabinet another TLR make and model not clear, I asked to take a look, it turned out to be an early Yashica C. The camera was very reasonably priced and the shutter appeared to be working ok, so I purchased it. I did not feel it was fair to leave it laying forlorn in the cabinet any longer – that is my excuse and I am sticking to it!
The obvious question is. What do you do when you have 2 new (to you) TLR cameras? The answer is to take them out for a side by side test!
For the purpose of the test both cameras were loaded with Rollei RPX 400 black and white film, all exposures were measured using a Lunasix light meter, apertures were set identically on both cameras and shutter speeds set accordingly. Both cameras were tripod mounted to eliminate the chance of camera shake and to enable identical photographs to be taken.
Specification
Seagull WWSC Yashica C
Year of manufacture Approx 1996 1956
Film format 120 roll film 120 roll film
Number of exposures 12 – 6×6 frames 12 – 6×6 frames
Film advance Lever wind Wind wheel with safety button
Viewing lens Haiou 75mm f2.8 – 3 elements in 3 groups Yashikor 80mm f3.5 – 3 elements in 3 groups
Taking lens Haiou 75mm f3.5 – 3 elements in 3 groups Yashikor 80mm f3.5 – 3 elements in 3 groups
Focus range 1 metre to infinity 1 metre to infinity
Shutter Between lens leaf shutter – B, 1 to 1/300th second Between lens leaf shutter – B, 1 to 1/300th second
Shutter actuation Auto cocked via film advance Shutter cocked via separate lever
Focus Flip up hood with magnifier, ground glass screen with fresnel split Flip up hood with magnifier and ground glass screen
Focus mechanism Front standard focus via wheel Front standard focus via wheel
Flash Synch At all shutter speeds/X +M / PC socket At all shutter speeds/X +M / PC socket

Loading the cameras
The Seagull and Yashica cameras are both loaded the same way – that is that the unexposed film is placed in the lower chamber, the leader is fed onto an empty film spool in the upper chamber, the film is then advanced until the start indicator on the film lines up with the two dots on the back of the camera (see photo). The film back is now closed and locked with the wheel on the base of the camera and now the film is advanced via the wind crank in the case of the Seagull and the wheel in the case of the Yashica C. Reversing the Seagull’s crank lever cocks the camera shutter, the Yashica C shutter is set with a small lever around the lens – with the Yashica it is essential to set the shutter speed prior to cocking the shutter.

Film start markers
The cameras in use
Both cameras a similar in operation – they have a pop up hoods with spring loaded magnifier to aid focus, the magnifier is utilised by pressing the centre of the hood, the magnifier then unlatches and flips up so it is above the focussing screen, once you have done with it just press it back into the hood where it will lock back into place. The Seagull has its focus wheel on the left side of the body, whilst the Yashica focus wheel is located on the right hand side. Aperture settings are adjusted via a lever and in both cases the range goes from f3.5 through to f22. Shutter speeds are likewise changed with a lever on the opposite side to the aperture scale, whilst the Seagull shutter speeds are from B, 1 ½, ¼, 1/8, 1/16, 1/30, 1/30, 1/60, 1/125 and 1/300, the Yashica having an older generation Copal shutter its speeds range from B, 1, ½, 1/5, 1/10, 1/25, 1/50, 1/100 and 1/300. Since most negative film has a degree of latitude the variation between the cameras is not an issue, it may however cause a problem with less tolerant transparency film.
For those wishing to use a lens hood or filter, it is worth noting that the Seagull has a screw thread mount of 34mm, whilst the Yashica uses a more common mount found most other TLRs that being a Bayonet 1 mount.
I noticed that focusing with the Seagull is a little easier due to the split prism centre spot in the focusing screen, but at the same time that the focus wheel
The Results
Since both the Seagull and Yashica have a similar optical setup, admittedly with a 5mm difference between focal length, the results were quite close. Neither lens was super sharp at full aperture, usable but only just, major improvements were seen by f8 and gained a little more sharpness by f11, nothing more was gained by stopping down to f22. Vignetting was well controlled on both lenses, not causing serious issues at any aperture. The only major difference between the two cameras was that the lens on the Seagull showed slightly better control of flare, this is due to the fact that the Haiou lens is multi coated rather than the single coating on the Yashicor lens.

Seagull WWSC Yashica C

Seagull WWSC Yashica C
Conclusions
Either camera will give acceptable results, the lenses are not ‘state of the art’ sharp enough to provide a 30cm square print without too much trouble.
The Seagull WWSC is suspected by many to have been built on old Japanese TLR tooling, the shutter has more than a passing resemblance to an early Copal shutter. Added to this the build quality is good but not stunning The WWSC is said to be the export quality of the Seagull 4a model. Putting a precise age on the WWSC is difficult due to the myriad of Seagull models released with little information on production dates.
My Yashica C has definitely seen better days, but in saying that it is still a well built robust camera.
Which camera would I recommend? Simple answer if you can find either one in good working order then both will give good results, just remember treat them carefully, set the shutter speed before cocking the shutter on the Yashica C and all will be ok
-
Agent Shadow – First Impression
Whilst at the Photography Show in Birmingham last September I had the opportunity to meet with Stephen Dowling, the man behind Kosmo Foto and the promoter of two black and white negative films – Kosmo Foto Mono, rated at 100 ISO – available as 35mm and 120 roll film and the recently released Kosmo Foto Agent Shadow 400 ISO film, available as 35mm film which is being reviewed here.
Neither film stock is a new emulsion, Mono is made by a European manufacturer (Foma) and Agent Shadow by a respected manufacturer with over 100 years experience. More about that later.

There are those who would say that a rebadged film is a waste of time, but look at it this way – Ford does not make every component for their vehicles, a large number of parts are bought in from specialist manufacturers and nobody complains!
On to the testing of Agent Shadow. I exposed one roll at the box speed of 400 ISO and a second roll at 3200 ISO. Agent Shadow is advertised as having the capability of being pushed to 6400 ISO. Both films were processed in 510 Pyro developer using the appropriate development times. Agent Shadow is marketed a being an emulsion harking back to the Film Noir Era, low light levels, lots of contrast and deep shadows. Both the rolls I exposed were taken under fairly flat lighting conditions, so contrast would be a bonus.
For the purpose of the test I used a Nikon FM with either a Tokina 35-105mm f3.5-4.5 or a Nikkor 28 – 70 f2.8 lens. Exposure was set using a Gossen Lunasix lightmeter.
How did the film perform?
Having scanned both films at base settings I examined the results at 100% magnification in Photoshop. Both films displayed good contrast, a bit higher with the 3200 rated film – but this was to be expected and grain more evident but never obtrusive. Both films showed good levels of sharpness, combined with excellent shadow and highlight detail. Put plainly this film will work well under most conditions subject to correct development. If the film is processed in something like Rodinal, then expect more grain and a bit more contrast, but that is the nature of Rodinal and that is a matter of individual taste.
Samples


The above photographs were exposed at box speed of 400 ISO


The above photographs were exposed at 3200 ISO and processed accordingly
How does Agent Shadow rate against comparable films?
In practical terms, Agent Shadow has a slightly coarser grain structure than Ilford HP5 and Kodak Tmax 400.
Agent Shadow is described as ‘similar to Ilford HP5 but a little less silver content’. This is also the description given to Kentmere Pan 400 ( a clue to its heritage?) The processing times are identical another clue? Similarly Agfa APX 400 and Rollei RPX 400 also share the same processing times and are also both marked as produced in the UK, likely to indicate that they are the same emulsion all produced by Harman (Ilford). However since everyone has a personal favourite brand this is hardly an issue.
If you are looking for a good all round film that will push process well, look no further than Agent Shadow.